Battery switch on travel trailer function is crucial for managing your RV’s power. Understanding how it works, from its various types and wiring diagrams to troubleshooting common problems, is key to a smooth and safe camping experience. This guide will walk you through everything you need to know, from basic operation to advanced configurations involving solar panels and inverters, ensuring you’re confident in managing your travel trailer’s electrical system.
We’ll cover everything from the simple act of connecting your battery to your trailer’s electrical system to the more complex aspects of integrating solar panels and inverters. We’ll also explore preventative maintenance, troubleshooting techniques, and the different types of battery switches available, helping you choose the right one for your specific needs. Get ready to become a power management pro!
Troubleshooting Common Battery Switch Issues: Battery Switch On Travel Trailer Function
Your travel trailer’s battery switch is a crucial component, ensuring you have power when you need it. Problems with this switch can leave you stranded without lights, refrigeration, or other essential systems. Understanding common issues and how to troubleshoot them will save you time and frustration.
Let’s explore some common problems and their solutions. A malfunctioning switch can stem from several sources, from simple user error to more complex electrical faults.
Battery Switch Failure to Turn On
A battery switch that refuses to turn on is a frustrating but often fixable problem. First, visually inspect the switch itself. Look for any obvious signs of damage, such as broken parts, corrosion on the terminals, or loose wiring. Tighten any loose connections and clean any corrosion using a wire brush and a battery terminal cleaner. If the switch still doesn’t work after this, you’ll need to check the power supply to the switch.
This often involves tracing the wiring back to the power source, ensuring there are no blown fuses or tripped circuit breakers. A multimeter can be invaluable in confirming power is reaching the switch.
Diagnosing a Faulty Battery Switch with a Multimeter
A multimeter is an essential tool for diagnosing electrical problems. To test the battery switch, you’ll need to use the multimeter’s continuity setting. First, ensure the switch is in the “off” position. Then, place one multimeter probe on each of the switch’s terminals. If the switch is working correctly, the multimeter should show an open circuit, indicating no continuity.
Next, turn the switch to the “on” position. Now, the multimeter should show a closed circuit, indicating continuity. A lack of continuity in either position indicates a faulty switch. Remember to always disconnect the battery’s negative terminal before performing any electrical tests for safety.
Low Battery Voltage Despite a Functioning Switch
Even with a properly functioning battery switch, you might experience low battery voltage. This could be due to several factors. The most common cause is a parasitic drain – a small but constant draw of power from the battery even when the trailer is not in use. This drain can slowly deplete the battery over time, leading to low voltage.
Another possibility is a faulty battery itself. A battery that’s old or damaged may not hold a charge properly, regardless of the switch’s operation. Finally, ensure your batteries are properly charged. If they are significantly discharged, even a functioning switch won’t be able to provide sufficient power. Using a battery charger and performing a load test on the battery can help determine if the battery itself is the problem.
Maintaining Your Travel Trailer’s Battery System
Keeping your travel trailer’s battery system in top shape is crucial for reliable power on the road. Neglecting maintenance can lead to premature battery failure, leaving you stranded without lights, water pump, or other essential appliances. A proactive approach to maintenance will extend the life of your batteries and prevent unexpected breakdowns.Regular maintenance prevents costly repairs and ensures your peace of mind while enjoying your adventures.
A well-maintained battery system provides consistent power, vital for comfortable and safe travels.
Preventative Maintenance Schedule
A simple schedule helps ensure your battery system remains healthy. This should be adapted to your usage frequency, but a good starting point is:
- Monthly Inspection: Visually inspect battery terminals for corrosion, check electrolyte levels (if applicable), and ensure secure connections.
- Every Three Months: Perform a thorough battery test using a multimeter to check voltage and load testing. Clean battery terminals and connections.
- Annually: Have your battery system professionally inspected, especially if you notice any performance issues. Consider replacing batteries every 3-5 years, depending on usage and type.
Importance of Regular Battery Testing and Cleaning
Regular testing and cleaning are vital for optimal battery performance and longevity. A simple voltage check with a multimeter reveals the battery’s state of charge. Low voltage indicates a charging problem or potential battery failure. Load testing assesses the battery’s ability to deliver current under load, identifying potential internal issues.Cleaning the battery terminals removes corrosion, which increases resistance and reduces power flow.
Corrosion buildup can lead to overheating, damage to the battery, and even fire hazards. Use a wire brush and baking soda solution to clean terminals effectively.
Battery Connection and Cable Inspection Checklist, Battery switch on travel trailer function
Before each trip, a quick inspection of your battery connections and cables is recommended.
- Terminal Condition: Check for corrosion, looseness, or damage to the battery terminals. Look for any signs of white, powdery buildup.
- Cable Condition: Inspect cables for cracks, fraying, or any signs of damage. Check for secure connections at both the battery and the switch.
- Tightness of Connections: Ensure all connections are securely fastened. Loose connections can lead to poor performance and increased resistance.
- Cable Routing: Ensure cables are properly routed and secured to prevent damage or accidental short circuits. Avoid sharp bends or kinks in the wiring.
Essential Tools for Maintaining a Travel Trailer’s Battery System
Having the right tools makes maintenance easier and safer.
- Multimeter: Essential for testing battery voltage and load.
- Wire Brush: For cleaning battery terminals.
- Baking Soda: Creates a paste with water for effective corrosion removal.
- Battery Terminal Protector: Prevents future corrosion.
- Wrench Set: To tighten and loosen battery terminals.
- Safety Glasses: Protect your eyes from splashing acid.
- Gloves: Protect your hands from corrosive substances.
Different Battery Switch Configurations
Choosing the right battery switch for your travel trailer is crucial for managing your power sources efficiently and safely. The type of switch you need depends on the number of batteries you have and how you want to use them. Let’s explore the common configurations.
Single Battery Switch Configurations
A single battery switch is the simplest setup, ideal for travel trailers with only one battery. This switch simply connects or disconnects the battery from the trailer’s electrical system. It offers straightforward operation and is the most cost-effective option. However, it lacks the flexibility to manage multiple batteries or isolate specific circuits. This can be limiting if you want to prioritize certain systems or protect against parasitic drain.
Dual Battery Switch Configurations
Dual battery switches are designed for travel trailers with two batteries, typically a house battery and a starting battery. These switches allow you to isolate each battery, connect both batteries in parallel for combined power, or select one battery for use while isolating the other. This offers greater control and protection, preventing a discharged house battery from affecting the starting battery.
The added flexibility comes at a slightly higher cost than a single battery switch. A common scenario is using one battery for house appliances and the other for engine starting.
Three-Way Battery Switch Configurations
Three-way battery switches provide the most flexibility, allowing you to manage three power sources: a starting battery, a house battery, and often an external shore power connection. This configuration offers independent control over each battery and the ability to combine them for increased capacity. It’s the best choice for larger travel trailers with high power demands, ensuring you have enough power for all appliances and systems, regardless of whether you’re on shore power or relying solely on batteries.
However, it’s the most complex and expensive option. A key advantage is the ability to charge all batteries simultaneously from shore power.
Planning a trip? Don’t forget travel insurance! Check out Aon travel insurance for comprehensive coverage. They offer various plans, so you can find one that fits your needs and budget. Then, once you’ve sorted that out, compare it to another provider like Aon travel insurance – sometimes different websites offer slightly different deals.
Remember to read the fine print before committing to any policy, so you know exactly what’s covered!
Choosing the Right Battery Switch
Selecting the appropriate battery switch depends on your trailer’s setup and power requirements. Consider the number of batteries, the power demands of your appliances, and your need for flexibility in managing power sources. A single battery is sufficient for basic trailers with minimal power needs, while dual or three-way switches are better suited for larger trailers with more complex electrical systems.
Always ensure the switch’s amperage rating is sufficient for your batteries and electrical system to prevent overheating and damage.
Examples of Battery Switch Brands and Models
Below is a table showcasing examples of battery switch brands and models. Note that prices and features can vary based on retailer and specific model.
| Brand | Model | Features | Price Range |
|---|---|---|---|
| Blue Sea Systems | 7625 | Single battery switch, high amperage rating, durable construction | $20-$40 |
| Perko | 0543DP2 | Dual battery switch, positive and negative switching, marine-grade | $50-$80 |
| AGS | 100 Amp 3-Way | Three-way switch, high amperage, suitable for larger systems | $100-$150 |
| Victron Energy | Cyrix-ct 12/24-120 | Smart shunt for battery monitoring and switching (not a traditional switch, but provides similar functionality) | $150-$250 |
Battery Switch and Solar Panel Integration
Integrating a solar panel system with your travel trailer’s battery switch is a fantastic way to extend your off-grid capabilities and reduce reliance on shore power. This setup allows your solar panels to directly charge your house batteries, managed through your existing battery switch system. Proper integration ensures efficient charging and protects your valuable batteries.Adding solar power involves connecting solar panels, a charge controller, and your battery switch in a specific configuration.
This ensures the solar energy is safely and effectively channeled to your batteries. Careful consideration of wiring and component selection is crucial for a reliable system.
Solar Panel, Charge Controller, and Battery Switch Wiring Diagram
A typical setup involves connecting the solar panels to a charge controller, which then connects to your battery switch. The charge controller acts as a crucial safety device, preventing overcharging and damage to your batteries. Imagine a simple diagram: The positive wire from your solar panel array goes to the positive input of the charge controller. The negative wire from the array connects to the negative input of the charge controller.
The positive output of the charge controller connects to the positive terminal of your battery bank through the battery switch. The negative output of the charge controller connects to the negative terminal of your battery bank, also through the battery switch. This allows you to switch the battery bank on or off independently from the solar input. A properly sized and correctly installed fuse should be incorporated in the positive wire from the solar panel array to the charge controller.
Another fuse is advisable on the output side of the charge controller to protect the wiring and batteries.
Optimizing Solar Panel Charging for Extended Battery Life
To maximize battery life and efficiency, consider these points. First, ensure your solar panels are correctly oriented to receive maximum sunlight throughout the day. Second, select a charge controller that’s compatible with your battery type (flooded lead-acid, AGM, lithium) and the solar panel wattage. Using the wrong controller can lead to undercharging or overcharging, damaging your batteries. Third, regularly check your battery voltage and state of charge to monitor their health and charging effectiveness.
So, you’re planning a trip? Awesome! Don’t forget travel insurance – it’s a lifesaver. Check out Aon travel insurance for comprehensive coverage. They offer various plans, so finding one that fits your needs and budget shouldn’t be a problem. And if you need a bit more help navigating the options, another great resource is Aon travel insurance , which provides detailed comparisons and customer reviews to help you make an informed decision.
Get insured and enjoy your trip worry-free!
A fully charged battery will generally maintain a voltage around 13.5-14.5V (depending on battery chemistry). Finally, avoid consistently deep-discharging your batteries; this significantly reduces their lifespan.
Importance of Using a Charge Controller for Battery Protection
A charge controller is not merely a convenience; it’s essential for protecting your batteries. Solar panels can generate a higher voltage than what your batteries can safely handle. Without a charge controller, this overvoltage can damage or destroy your batteries. The charge controller regulates the voltage and current flowing from the solar panels to the batteries, ensuring a safe and controlled charging process.
It prevents overcharging, which leads to heat buildup, electrolyte loss, and reduced battery lifespan. It also protects against reverse current flow, which can occur at night when the solar panels are not producing power. The charge controller essentially acts as a gatekeeper, preventing any damaging current flow.
Battery Switch and Inverter Interactions

In your travel trailer, the battery switch and inverter work together to provide power, but their interaction needs careful consideration. The battery switch acts as a gatekeeper, controlling the flow of power from your batteries to the rest of your trailer’s electrical system. The inverter converts DC power from your batteries into AC power, which is needed for many appliances.
Understanding how these two components interact is crucial for safe and reliable power management.The battery switch’s primary role is to isolate your house batteries from the tow vehicle’s charging system or shore power. This isolation is vital for safety and preventing battery drain. The inverter, however, requires a direct connection to your house batteries to function. Improper interaction can lead to blown fuses, damaged inverters, and even fire hazards.
Safe Inverter Connection Procedures
Connecting an inverter correctly through the battery switch involves several key steps. First, ensure your battery switch is in the “off” or “house” position. This isolates the batteries from any other circuits. Next, connect the positive (+) and negative (-) wires from your inverter directly to your house batteries, observing correct polarity. Use appropriately sized wiring and fuses for the inverter’s amperage rating.
Finally, after the inverter is securely connected, switch the battery switch to the “on” position. This will allow the inverter to draw power from the batteries. Always consult your inverter’s manual for specific connection instructions. Never attempt to connect an inverter to a battery without fully understanding the proper procedures.
Inverter Types and Battery Switch Compatibility
Different inverters have varying power requirements and connection methods, affecting their compatibility with different battery switch systems. Understanding these differences is important for selecting the right combination.
- Pure Sine Wave Inverters: These inverters produce a clean AC waveform, ideal for sensitive electronics. They usually require a direct connection to the battery, often bypassing the battery switch completely or utilizing a dedicated circuit. This is because their power draw can be significant.
- Modified Sine Wave Inverters: These are less expensive and produce a less clean AC waveform. They are suitable for less sensitive appliances, and they may be compatible with a battery switch, but it’s crucial to check the inverter’s specifications and ensure the switch can handle the current draw.
- DC-to-DC Converters: These devices convert 12V DC to a higher DC voltage (e.g., 19V for a laptop). They typically draw less power than inverters and are often compatible with battery switches as long as the switch’s amperage rating is sufficient.
For example, a large pure sine wave inverter might require a dedicated circuit breaker and heavy-gauge wiring directly connected to the batteries, bypassing the battery switch entirely. In contrast, a smaller modified sine wave inverter might work safely with a standard battery switch system provided it’s appropriately fused and the switch’s amperage rating is not exceeded. Always refer to the manufacturer’s specifications for both the inverter and the battery switch to ensure compatibility and safe operation.
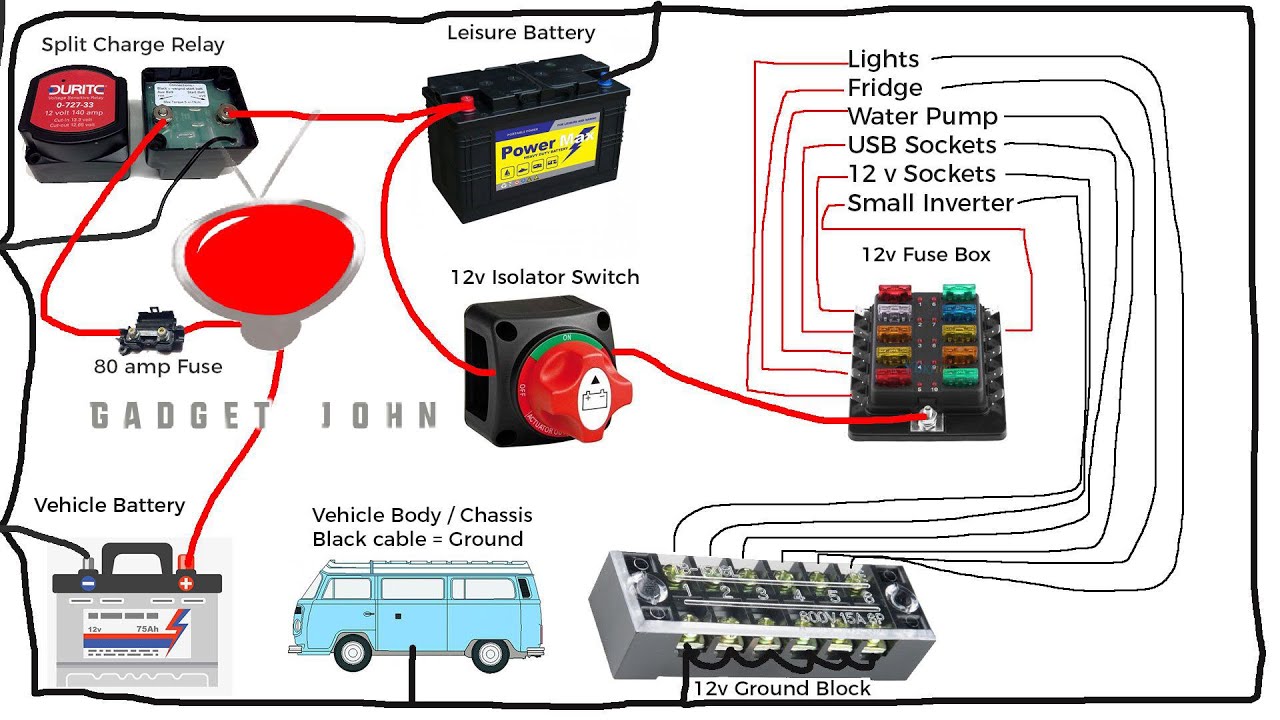
Visual Representation of Battery Switch Placement and Wiring
Finding your travel trailer’s battery switch is crucial for managing power. Ideally, it should be easily accessible but also protected from the elements and accidental damage. Understanding its placement and wiring is key to safe and efficient operation.A typical battery switch location is within a dedicated compartment, often near the batteries themselves, underneath the trailer, or inside a roadside access panel.
This placement offers protection from rain and debris while maintaining convenient access for routine checks and operation. Safety is paramount; the switch should be clearly labeled and ideally located away from potential sources of water or ignition. Never work on the battery system while the switch is on.
Battery Switch Location Examples
Common locations include a dedicated battery compartment, often located at the front or rear of the trailer, underneath a side access panel, or even inside a storage compartment with good ventilation. Access is usually straightforward, typically requiring only the opening of a door or panel. However, some trailers may have less accessible locations, requiring the removal of other components to reach the switch.
Typical Battery Switch Wiring Diagram
Imagine a simple diagram. We start with your trailer’s battery (represented by a ‘+’ and ‘-‘ symbol). A heavy-gauge wire runs directly from the positive (+) terminal of the battery to the input terminal of the battery switch. Another heavy-gauge wire runs from the negative (-) terminal of the battery to the chassis of the trailer (ground). This is critical for completing the electrical circuit.The battery switch itself has several terminals.
The input terminal connects to the positive battery wire. The output terminals connect to the positive wires feeding the trailer’s 12V system. The output terminal also often connects to a fuse or circuit breaker for added safety. From the output terminal of the switch, additional wires distribute power to various systems within your trailer, like lights, pumps, and appliances.
These wires should be appropriately sized for their intended loads. Remember, all connections must be secure and corrosion-free.
Safety Considerations
Working with batteries and electrical systems requires caution. Always disconnect the negative (-) battery terminal before working on any wiring or components connected to the battery switch. Use appropriate safety glasses and gloves. Never allow children near a working battery system. If you are unsure about any aspect of the wiring or battery system, consult a qualified RV technician.
Mastering your travel trailer’s battery switch is a significant step towards becoming a confident and self-sufficient RVer. By understanding the various configurations, troubleshooting techniques, and maintenance practices Artikeld in this guide, you can ensure your electrical system remains reliable, extending your adventures on the road. Remember, regular checks and preventative maintenance are your best allies in preventing unexpected power outages and ensuring a safe and enjoyable RV experience.
Happy travels!
Frequently Asked Questions
What happens if my battery switch is left in the “off” position?
Leaving the switch off completely disconnects the house batteries from the trailer’s electrical system. This prevents battery drain but also means you won’t have power to appliances or lights.
How often should I test my travel trailer’s batteries?
Ideally, test your batteries every few months, especially before and after long storage periods. This helps catch potential problems early.
Can I use a standard car battery in my travel trailer?
While you
-can*, it’s generally not recommended. Deep-cycle batteries designed for RVs are better suited for the repeated charging and discharging cycles involved in RV use. Car batteries are typically designed for short bursts of high power.
My battery switch is making clicking noises. What’s wrong?
Clicking often indicates a low battery voltage or a problem with the switch itself. Check your battery voltage and inspect the switch for any damage or loose connections.
